Tired of going out to buy soft pretzels? or just thought homemade pretzels are to hard to make? Well then your in for a treat. Pretzels are very easy and you only need a few ingredients, which are.
1 package (1/4) active dry yeast
1 cup of warm water (110 to115 Fahrenheit)
2 Tbs butter, softened
1 Tbs sugar
1/2 teaspoons salt
2 3/4 cups all purpose flour
2 Tbs baking soda
coarse salt
To start in a large mixing bowl dissolve yeast in warm water.(Note: water should be warm enough to be safe to keep your finger in if its hotter then that it will kill the yeast) Add butter, sugar, salt , and 2 cups of flour;
- Beat until you have a smooth texture
- Stir in enough remaining flour to form a soft dough
- Once you made the dough put it in a bowl and cover it. place it somewhere warm for 20 mins to rise; it should double in size.
- Punch dough down. Divide into 12 equal pieces.
- Roll each of them to long stripes
- Shape them into a circle with about 3 in of each end overlapping.
- Twist the ends where they overlap
- Flip the twisted ends over the circle; placed ends around edge and pinch under
After shaping the pretzels, put water to a boil then add the baking powder ( be careful not to add it in to fast it will over flow) Drop a pretzel in and let it boil for one min. Remove with a slotted spoon; drain. Place on a greased baking sheet; sprinkle with coarse salt ( Note: Don’t go crazy with the salt like I did, just a pinch or two will be nice ) Repeat with the rest of the pretzels.
They should look kind of bloated like this
Bake at 475 for 10-12 mins soon enough you will have these beauties dipped them in a nice cheese dip, butter, Jam or whatever you like ^^ Great for parties for just a midnight snack!!


This post was written by:
 KAT VERA - (view all posts by Kat)
Kat is a lead pastry chef. When she isn’t in the kitchen she’s traveling space and time with Doctor Who and solving mysteries with Sherlock. Email her at kat@mind-speaks.com
Recently I moved onto more personal and freelance jobs. I went ahead and tried to make little cute stationary and thank you cards for my sister Kim. She is going to be starting up school again at U of H and I thought this would be a nice gift to have waiting for her return. Although since I am posting the pics on here….I guess it is not a surprise anymore. BUT I needed to post something for August annnnnnnd so there you have it! Everything is made in vector style to match her blog layout I made last year.


Everything is super tiny and runs with green color theme plus die cut edges. I am obsessed with matching things up!
This post was written by:
 MIJA VERA - (view all posts by Mija)
Mija has been a designer for the last 15 years. She is a paper obsessed fiend and loves working on new projects while listening to her kids and Maine Coon cat chatter around the house. You can email her at mija@mind-speaks.com
I have soooooo many projects that I want to start yet I’m overwhelmed by each idea that I can’t seem to start any of them. >.<Today I made a list of projects that I wanted to at least get started on, not only for MS but projects that I do for family and myself. Today’s project is pretty simple, I was inspired by this blog entry but I made some changes to how I made mine. I figure this would be perfect to offer on the MS store when its up. Hopefully it will be up during the fall season but you know how life gets in the way. But here’s hoping. 🙂
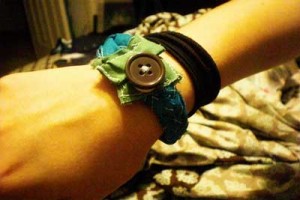
Materials needed
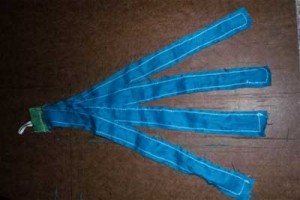
- 3 or 4 strips of fabric (1×12 or 2×12)
- second fabric (2 rectangles)
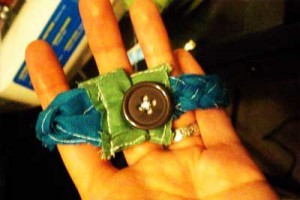
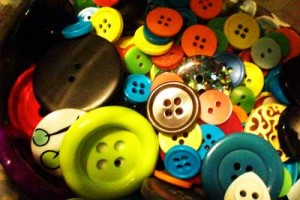
- button and or Velcro
- scissors
- elastic band
- sewing machine and or needle and thread
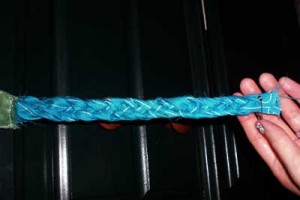
I love working with braiding, I get so excited when I learn how to braid a new style. I also enjoy making bracelets, so I thought I’d combine the two. I have small wrists so just adjust the size to what is comfortable for you. Mine was made with 4 1×12 strips of teal fabric. I thought about using different fabrics but I felt like the solid color would match with more outfits. But feel free to use different fabrics for each strip. I also chose to use elastic band and made loop so it could wrap around the button. I thought about using Velcro but I hate Velcro and really love buttons. XD I think the next time I make one I’m gonna sew the strips inside out that way the sides don’t fray as much. But that I still like the outcome of it and its pretty easy to make. Especially when you play around with different braiding techniques, I used 4 strips instead of the typical 3. I know impressive. 😛
Well I’ll see you in October with another project….sooner if my partners update earlier. 😀
This post was written by:
 KIM VERA - (view all posts by Kim)
Kim works as a museum Copywriter and helps out with events from time to time. When she isn’t working or blogging, she is probably off taking a nap. Feel free to email her at kim@mind-speaks.com


 Email
Email Twitter
 Facebook
 YouTube
 Instagram
 Bloglist Me