I’ve been wanting to paint my own R2D2 shoes after seeing these on Etsy. And I finally made time to do it and I’m pleased with how they came out.
Now mine didn’t come out as fancy, but I worked hard on them and they only cost about 15 dollars to make.
Materials used:
- Tape
- Fabric or acrylic paint
- pencil
- canvas shoes
- paint brushes/sponges
- plenty of napkins!
- modpodge/fixative
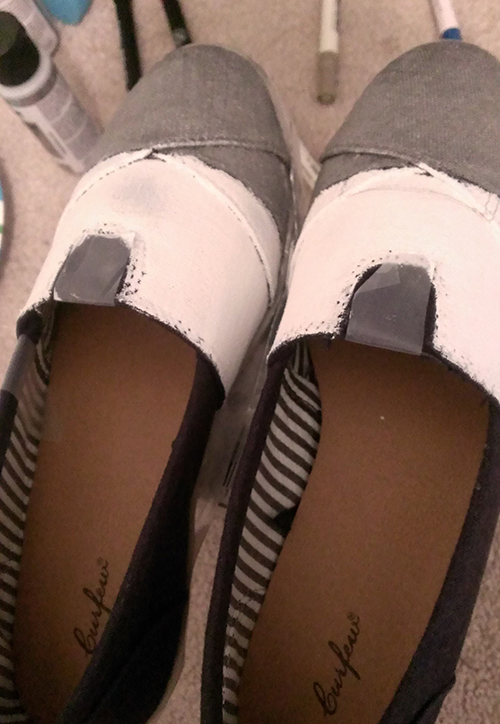
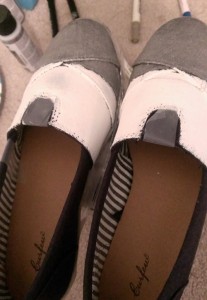 Most Etsy sellers have them priced at $40+ due to the type of shoes they use, most common are Toms. I found canvas lookalikes, called Curfew, for 10 bucks at Krogers. I wanted to purchase some van lookalikes from Walmart that were priced at 5 something. However, they didn’t have my size. But these work just as well. I used acrylic paint and also fabric paint pens to draw on the designs. I’m not an artist, but I had a lot of fun making them. What I found difficult was getting both shoes to look identical. It didn’t happen, but perfection isn’t necessary when creating. For mine, after taping up the sides of the shoes I painted the
 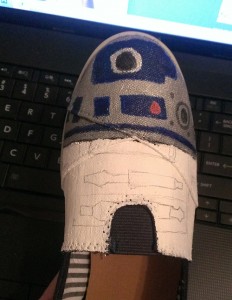 tops of my shoes a metallic silver and just under that I painted them white. I left the elastic part of the shoes on front blue. Both paints where solid enough so one to two coats were enough. After the paint dried I was able to draw on what needed to be painted blue. R2 has a bunch of stuff going on so I’m glad I was able to use a pencil. His head was a bit more difficult to draw on seeing as the pencil blended in with the silver paint. This is the part where getting both shoes to look the same became difficult. I’m not a perfectionist, so it only bothered me for a few minutes. Then, I slowly colored in the marks I had drawn with blue paint pens. You know, the kinds that you shake to get them to start working? I left the sides of the shoes alone and only painted the heals of the shoes with sparkle paint. I thought it added a little something extra to them. I had a lot of fun working on these, after completing mine I decided to make some for Mija as well.
Continuing on with the Star Wars theme, I made her some Boba Fett shoes. These weren’t as common, and a bit difficult to paint. I had bought blue canvas for my R2 shoes, and I had planned on using tan shoes for Boba, but red was the only ones available in her size. I figured since Boba has red on his helmet this would be ok. However, the red paint I had purchased was a bit too bright and therefore I had to paint over the canvas red. Still, the shoes came out alright and I’m pleased with them as well. I had no idea what to do with the sides or the heals, I couldn’t leave them red because then it could clash with the helmet. So I decided to paint the rest of the shoes black and painted stripes of yellow and grey on the sides.
Kat decided to to paint her own shoes, and seeing as she’s more of a Dr. Who fan than a Star Wars fan, she decided to make some galaxy Tardis shoes. Using the same Curfew shoes, she also bought hers in blue, she had to paint hers white before she could start adding other colors. After painting we sprayed them with hair spray, but after a day of walking in them, Kat’s had started to peel. So we decided to spray them with modpodge. I’m hoping this will keep the paint from peeling. They are easy to make, but I don’t want them to start peeling after one day of wear. That’s no fun. :I I might go over them with some paint modpodge as a reinforcement. But I know, not everything is meant to last. Also, these types of shoes create blisters, so I’d wear socks with them. Still, this was a lot of fun, and I highly recommend you trying this out for yourself.
This is a great DIY project to do with your kids, or if you’re nerdy like me then you’ll love it for yourself. Send a link to your own shoes if you decide to make some, I’d love to see what you create.
Thanks for reading and commenting.
This post was written by:
 KIM VERA - (view all posts by Kim)
Kim works as a museum Copywriter and helps out with events from time to time. When she isn’t working or blogging, she is probably off taking a nap. Feel free to email her at kim@mind-speaks.com
So I’ve been working on a few different sewing projects. But they haven’t been coming out like I hope. So I have stepped away from my sewing projects…for now. I’m the type of person who can’t sew if I’m frustrated. I end up making more mistakes so its just best to focus on something else.
Thankfully there are many other things I can do to be creative. My best friend had her baby shower a while back and  she had asked me to decorate a letter from her daughter’s name for her nursery. I got the letter L but I was having trouble deciding on how I wanted to decorate this letter. I knew I wanted to use a minty color, and then while browsing around Hobby Lobby I found a shadow box picture frame. I’ve always wanted to make a shadow box of my own but just never got around to it. So I found a small L and decided to make one for my friend. I had planned on putting some pretty paper behind the letter but then remembered I had some really cute fabric that matched the color of paint that I chose for the frame. I think it came out exactly how I pictured it, added bonus the bedding she registered for at Target totally match the shadow box. So that worked out great. :3 Moving on to the next creative topic. I finally got my hands on a SMASH* book. I’m really excited about it. Mija and I mention it over at our personal blogs, so feel free to check it out. We here at Mind-Speaks love crafting so we each fell in love with the SMASH* books. I purchased the Eco book and
 I’m loving it. At first I was a bit hesitant, I didn’t want to “ruin” the pages. But once I started “smashing” I was no longer worried. And I’m now obsessed. Right now I’m currently working on my hobby page. I first started with my more obvious hobbies. Writing and sewing are my big hobbies. But I like to think of myself as a collector of hobbies. I love learning new skills, however, I wouldn’t exactly say I exceed at them. But it doesn’t stop me from learning. I taught myself how to use a sewing machine and to knit. Thank goodness for the internet. Back to the page, so as you can see the majority of this page is focused on sewing. It’s the easiest hobby to smash. I was having trouble figuring out how to show case the rest of my hobbies. I turned to the net for some inspiration and I discovered a bunch of free printables. I immediately started pinning and printing. I do plan on making some of my own but I thought since these were done and ready for use I decided on making my own some other time. XD The ones I’m using on this page is a journal card from here and a capture this moment camera card from here. Great freebies if you’re interested. I used instagram pictures for this page, it actually helped clear
  the smashing block. I’m really happy with how my pages are turning out at this point. I kept thinking that I have to go in order when smashing but then I remember there are no rules to smashing. The point is to have fun with it and be creative. So this page is towards the back, I let the page speak for itself when I was deciding which one I wanted to use. The left page isn’t quite finished yet, there is actually a pocket on that side and I’m just trying to decided what I will smash in that pocket. I’m thinking maybe some poetry I wrote last semester or maybe a letter to myself. I dunno yet.
So what kind of planning do you do before you sit down to smash? Do you have rules you follow, or do you just wing it? :3
This post was written by:
KIM VERA - (view all posts by Kim)
Kim works as a museum Copywriter and helps out with events from time to time. When she isn’t working or blogging, she is probably off taking a nap. Feel free to email her at kim@mind-speaks.com
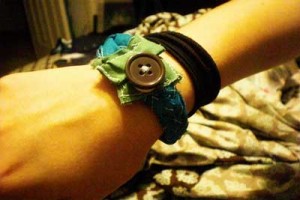
I have soooooo many projects that I want to start yet I’m overwhelmed by each idea that I can’t seem to start any of them. >.<Today I made a list of projects that I wanted to at least get started on, not only for MS but projects that I do for family and myself. Today’s project is pretty simple, I was inspired by this blog entry but I made some changes to how I made mine. I figure this would be perfect to offer on the MS store when its up. Hopefully it will be up during the fall season but you know how life gets in the way. But here’s hoping. 🙂
Materials needed
- 3 or 4 strips of fabric (1×12 or 2×12)
- second fabric (2 rectangles)
- button and or Velcro
- scissors
- elastic band
- sewing machine and or needle and thread
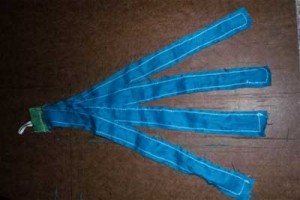
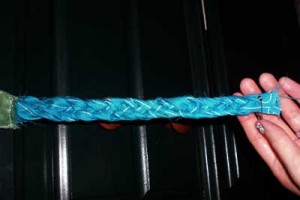
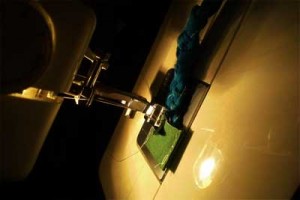
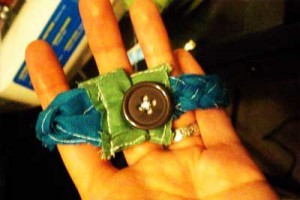
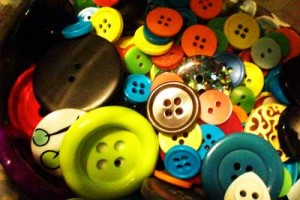
I love working with braiding, I get so excited when I learn how to braid a new style. I also enjoy making bracelets, so I thought I’d combine the two. I have small wrists so just adjust the size to what is comfortable for you. Mine was made with 4 1×12 strips of teal fabric. I thought about using different fabrics but I felt like the solid color would match with more outfits. But feel free to use different fabrics for each strip. I also chose to use elastic band and made loop so it could wrap around the button. I thought about using Velcro but I hate Velcro and really love buttons. XD I think the next time I make one I’m gonna sew the strips inside out that way the sides don’t fray as much. But that I still like the outcome of it and its pretty easy to make. Especially when you play around with different braiding techniques, I used 4 strips instead of the typical 3. I know impressive. 😛
Well I’ll see you in October with another project….sooner if my partners update earlier. 😀
This post was written by:
KIM VERA - (view all posts by Kim)
Kim works as a museum Copywriter and helps out with events from time to time. When she isn’t working or blogging, she is probably off taking a nap. Feel free to email her at kim@mind-speaks.com
 Most Etsy sellers have them priced at $40+ due to the type of shoes they use, most common are Toms. I found canvas lookalikes, called Curfew, for 10 bucks at Krogers. I wanted to purchase some van lookalikes from Walmart that were priced at 5 something. However, they didn’t have my size. But these work just as well. I used acrylic paint and also fabric paint pens to draw on the designs. I’m not an artist, but I had a lot of fun making them. What I found difficult was getting both shoes to look identical. It didn’t happen, but perfection isn’t necessary when creating. For mine, after taping up the sides of the shoes I painted the
  tops of my shoes a metallic silver and just under that I painted them white. I left the elastic part of the shoes on front blue. Both paints where solid enough so one to two coats were enough. After the paint dried I was able to draw on what needed to be painted blue. R2 has a bunch of stuff going on so I’m glad I was able to use a pencil. His head was a bit more difficult to draw on seeing as the pencil blended in with the silver paint. This is the part where getting both shoes to look the same became difficult. I’m not a perfectionist, so it only bothered me for a few minutes. Then, I slowly colored in the marks I had drawn with blue paint pens. You know, the kinds that you shake to get them to start working? I left the sides of the shoes alone and only painted the heals of the shoes with sparkle paint. I thought it added a little something extra to them. I had a lot of fun working on these, after completing mine I decided to make some for Mija as well.


 Email
Email Twitter
 Facebook
 YouTube
 Instagram
 Bloglist Me