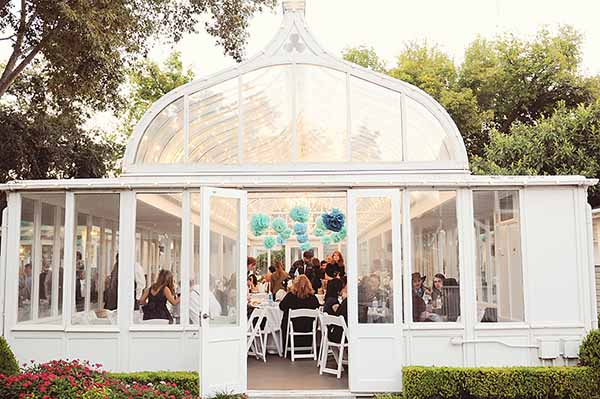
Paper Source posted about my wedding in their newest blog post! They accidentally put Austin instead of Houston but regardless I am honored. They asked me to write a small description about how they inspired our theme and which products that I used. I’m really happy to see the post, and I was able to revisit my wedding a bit. Our first anniversary is coming in October and I am just really happy for all of the love this year has been!
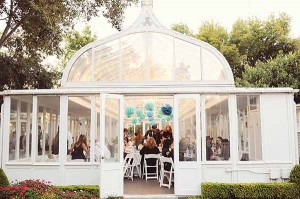 Please look at the Paper Source Blog for my wedding!
This post was written by:
 MIJA VERA - (view all posts by Mija)
Mija has been a designer for the last 15 years. She is a paper obsessed fiend and loves working on new projects while listening to her kids and Maine Coon cat chatter around the house. You can email her at mija@mind-speaks.com
So Kim found this recipe and wanted me to try making it… Challenge accepted!! ( yes I’ve been watching too much How I met your mother)
What I will be making is an English dessert called Lemon Posset and to jazz it up were going to make homemade vanilla strawberry jam.
Ingredients:
- 2 1/2 cups Double cream (Heavy cream)
- Sugar (2/3 cup Posset) (1 cup jam)
- 3 lemons
- 1 Vanilla pod
- 1 cup fresh strawberries
Pour the cream and 2/3 of sugar into a sauce pan and slowly boil. Simmer for 3 minutes and remove from heat
Zest and juice the lemons into the cream mixture and stir well. Pour the cream into ramekins or glasses and allow it to set for at least 4 hours in the fridge.
Halve the vanilla pod and chunk into the pan with the strawberries, a tiny splash of water and the remaining sugar (1 cup) heat to dissolve the sugar and stir the strawberries a little, then boil for 15 minutes before transferring to a clean jar allowing to cool in the fridge. Top the set lemon posset with vanilla strawberry jam.
Serve and enjoy
Serves 6
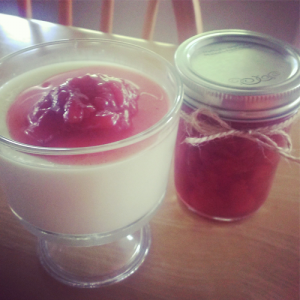
I really enjoyed this recipe its very nice and refreshing especially during the summer!! If y’all try this recipe please show pics!! Enjoy! ~Kat~
This post was written by:
 KAT VERA - (view all posts by Kat)
Kat is a lead pastry chef. When she isn’t in the kitchen she’s traveling space and time with Doctor Who and solving mysteries with Sherlock. Email her at kat@mind-speaks.com
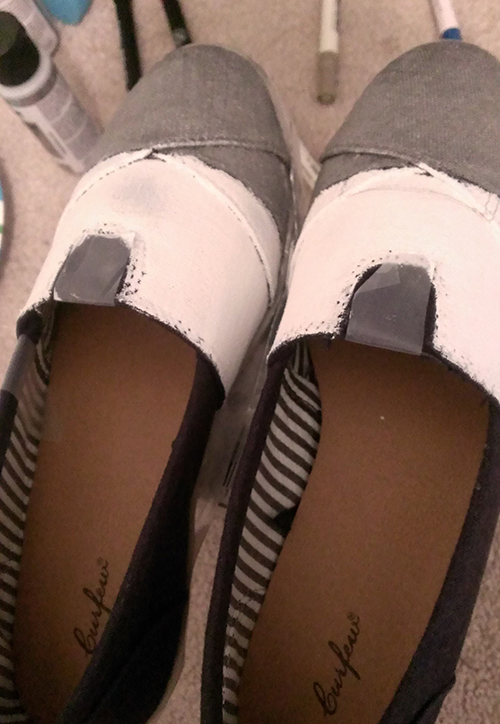
I’ve been wanting to paint my own R2D2 shoes after seeing these on Etsy. And I finally made time to do it and I’m pleased with how they came out.
Now mine didn’t come out as fancy, but I worked hard on them and they only cost about 15 dollars to make.
Materials used:
- Tape
- Fabric or acrylic paint
- pencil
- canvas shoes
- paint brushes/sponges
- plenty of napkins!
- modpodge/fixative
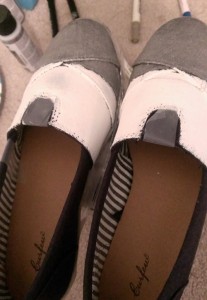 Most Etsy sellers have them priced at $40+ due to the type of shoes they use, most common are Toms. I found canvas lookalikes, called Curfew, for 10 bucks at Krogers. I wanted to purchase some van lookalikes from Walmart that were priced at 5 something. However, they didn’t have my size. But these work just as well. I used acrylic paint and also fabric paint pens to draw on the designs. I’m not an artist, but I had a lot of fun making them. What I found difficult was getting both shoes to look identical. It didn’t happen, but perfection isn’t necessary when creating. For mine, after taping up the sides of the shoes I painted the
 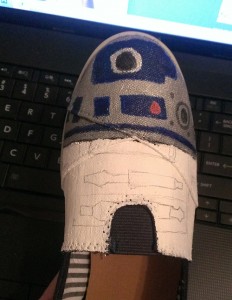 tops of my shoes a metallic silver and just under that I painted them white. I left the elastic part of the shoes on front blue. Both paints where solid enough so one to two coats were enough. After the paint dried I was able to draw on what needed to be painted blue. R2 has a bunch of stuff going on so I’m glad I was able to use a pencil. His head was a bit more difficult to draw on seeing as the pencil blended in with the silver paint. This is the part where getting both shoes to look the same became difficult. I’m not a perfectionist, so it only bothered me for a few minutes. Then, I slowly colored in the marks I had drawn with blue paint pens. You know, the kinds that you shake to get them to start working? I left the sides of the shoes alone and only painted the heals of the shoes with sparkle paint. I thought it added a little something extra to them. I had a lot of fun working on these, after completing mine I decided to make some for Mija as well.
Continuing on with the Star Wars theme, I made her some Boba Fett shoes. These weren’t as common, and a bit difficult to paint. I had bought blue canvas for my R2 shoes, and I had planned on using tan shoes for Boba, but red was the only ones available in her size. I figured since Boba has red on his helmet this would be ok. However, the red paint I had purchased was a bit too bright and therefore I had to paint over the canvas red. Still, the shoes came out alright and I’m pleased with them as well. I had no idea what to do with the sides or the heals, I couldn’t leave them red because then it could clash with the helmet. So I decided to paint the rest of the shoes black and painted stripes of yellow and grey on the sides.
Kat decided to to paint her own shoes, and seeing as she’s more of a Dr. Who fan than a Star Wars fan, she decided to make some galaxy Tardis shoes. Using the same Curfew shoes, she also bought hers in blue, she had to paint hers white before she could start adding other colors. After painting we sprayed them with hair spray, but after a day of walking in them, Kat’s had started to peel. So we decided to spray them with modpodge. I’m hoping this will keep the paint from peeling. They are easy to make, but I don’t want them to start peeling after one day of wear. That’s no fun. :I I might go over them with some paint modpodge as a reinforcement. But I know, not everything is meant to last. Also, these types of shoes create blisters, so I’d wear socks with them. Still, this was a lot of fun, and I highly recommend you trying this out for yourself.
This is a great DIY project to do with your kids, or if you’re nerdy like me then you’ll love it for yourself. Send a link to your own shoes if you decide to make some, I’d love to see what you create.
Thanks for reading and commenting.
This post was written by:
 KIM VERA - (view all posts by Kim)
Kim works as a museum Copywriter and helps out with events from time to time. When she isn’t working or blogging, she is probably off taking a nap. Feel free to email her at kim@mind-speaks.com


 Email
Email Twitter
 Facebook
 YouTube
 Instagram
 Bloglist Me