Just because Valentines day is over doesn’t mean you cant indulge yourself in some home made chocolates :9
Ingredients you will need:
1/3 Heavy cream
6 Tbs UNSALTED Butter
2 cup of Semi sweet or Bittersweet chocolate chips
First heat the heavy cream in a small sauce pan heat the cream and add the butter, stir until melted. Add chocolate chips and stir until completely melted and has a smooth texture (note: Chocolate can burn easily so make sure you keep your eye on it.) After the chocolate is melted pour it in a shallow bowl and refrigerate it for 2 hours or at least its firm. Once firm get a melon baller and form chocolate balls and roll it in nuts, coconut or whatever you like 😀 Refrigerate and enjoy last up to 2 weeks in a sealed container. Share the love and give them to a love one or a friend <3

This post was written by:
 KAT VERA - (view all posts by Kat)
Kat is a lead pastry chef. When she isn’t in the kitchen she’s traveling space and time with Doctor Who and solving mysteries with Sherlock. Email her at kat@mind-speaks.com
Seriously had trouble coming up with a nice Valentine’s gift for my boyfriend, Jody. First of all, I am not a romantic person nor the type to put much thought into gifts but Jody is someone amazing so I figured I should think of something cute and mushy!! Or as my sister Kim puts it….embracing the cheese!!
So I pondered: wouldn’t it be cool to design my very own wine or lemonade bottle to fit our relationship? Make a gourmet picnic and surprise him for a nice lunch?
Things I needed for the bottles:
Now, I designed and printed out labels of a vector drawing I did of us. I am 5 feet tall and Jody (boyfriend) is a mere 6 foot 3 soooooo I drew the image of him towering over me. Printed on full page labels, cut to size and placed over the bottles.

I took Mod Podge, and brushed over the label and bottle over night. Thanks to Kim for this tip! Dried like a charm – cleaned bottles and added my juice with my trusty funnel!! And ta-da! Fancy customized bottles! My valentine for my dude!


He seemed to really dig the bottles and I had a great time making them!! Again, thanks to Kim for all the help <3!!
This post was written by:
 MIJA VERA - (view all posts by Mija)
Mija has been a designer for the last 15 years. She is a paper obsessed fiend and loves working on new projects while listening to her kids and Maine Coon cat chatter around the house. You can email her at mija@mind-speaks.com
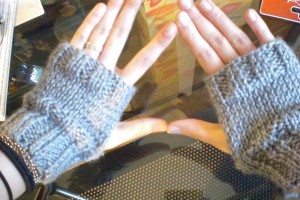
It is FINALLY COLD!!! I love wearing warm jackets,stockings and….SCARVES. Recently I learned how to knit, but I only know how to make scarves and fingerless mittens. XD
Materials…
- Size 8 US knitting needles
- yarn
- knitting needle
- scissors
- row counter (optional)
I followed this video, but since I had different size needles I had to changed it to work with what I had. The video calls for 24 chains, but I had to cast on 32 for the finished glove to fit my hand. The more chains you cast on the bigger the glove will be. Just make sure it is an even number. After you cast on 32 chains you knit 15 rows of rib stitch, (knit 2 purl 2) then 12 rows alternating between knit and purl rows. Lastly, return to the rib stitch with 6 rows (remember you can adjust these numbers to the size of glove you want). It might take a few times to get it just right but when you figure out your numbers the finish product is great.

I first learned how to finger knit which was an easy alternative to actually knitting with needles. But I taught myself over the winter break, I’m so happy that I finally learned. My next step is to learn how to knit hats. Then from there its on to crocheting. I want to learn how to make the amigurumi dolls. But so far I am stuck, so until I can learn how to do that I will strengthen my knitting skills. ;D
This post was written by:
 KIM VERA - (view all posts by Kim)
Kim works as a museum Copywriter and helps out with events from time to time. When she isn’t working or blogging, she is probably off taking a nap. Feel free to email her at kim@mind-speaks.com
 KAT VERA - (view all posts by Kat)


 MIJA VERA - (
 KIM VERA - (


 Email
Email Twitter
 Facebook
 YouTube
 Instagram
 Bloglist Me