Not too sure why I haven’t updated about this project but better late than never.
So I’m always on the look out for easy knitting projects, still no luck on learning how to crochet, and awhile back I discovered this great tutorial on knitted bows. Easy to follow and the results are great. If you haven’t followed M-S on facebook you should because sometimes we post projects we are working on without posting about them. The great thing about this tutorial is that you can be a beginner knitter and still be able to create this. I use whatever size needles I have. The bigger the size the bigger the bow. I mostly use a size 8 or size 5.
These bows are great for anything really. I mostly use them for my hair, you can just slip them on a clip or a headband and that is that. No muss no fuss. (odd phrase) I even made one for mys sister’s cat Tomo. As you can see from the picture he wasn’t very happy wearing it…but how cute does he look? Dogs might be a bit more accepting but I doubt it. You can also decorate a gift with these bows. I think it adds something special to the gift. And I’m crap when it comes to gift wrapping. So adding a bow usually helps me out during the holidays. But for some reason I never store those paper bows correctly and they always come out torn or squished. Now I can just slip this on a ribbon and call it a day.
You will get addicted after you make your first one. Fun and easy tutorial below.
This post was written by:
KIM VERA - (view all posts by Kim) Kim works as a museum Copywriter and helps out with events from time to time. When she isn’t working or blogging, she is probably off taking a nap. Feel free to email her at kim@mind-speaks.com
Today I bring you….my Star Wars fold clutch.I’ve been wanting to make a clutch for a while now and after I found this tutorial I decided to make one. I’ve been wanting a clutch for those nights when all I need is some lip balm, my id, cell, and a few dollars.
I need something small and compact that can carry a few things and not weigh me down. And this clutch suits those needs and I’m so happy with the finished product. Even though it came out a bit crooked, I had a little trouble, it still makes me happy. Now I followed the tutorial as best I could, but I had difficulties when it came to the zipper. So I kind of winged it when it came to that part. The next time I make one, I won’t make the same mistakes. I need a new rotary blade. I so wish I had that electronic cutter. It would make things soooo much easier for me. Also for the next time, I will have to keep in mind the direction of the fabric. Since mine has a pattern I didn’t think that about that and so the Star Wars words are upside down on the fold.
The middle picture shows what is under the fold. This fabric is my favorite fabric. I also made a messenger bag out of it. The fabric I used is actually a bed sheet and I am starting to run out of it. >o< But since this fabric isn’t as sturdy as I wish it was I had to add a lining of interfacing in it. I love adding the tabs on the ends of my zipper it helps a lot when sewing it. That is what I love so much about new projects and tutorials. They teach me new techniques and I actually feel my skills are improving.So I’m really glad there are sewers and knitters who post tutorials. If not for them, I wouldn’t have such great hobbies. >.<
Stay tuned for Mija’s update next month. :3
[subscribe2]
This post was written by:
KIM VERA - (view all posts by Kim) Kim works as a museum Copywriter and helps out with events from time to time. When she isn’t working or blogging, she is probably off taking a nap. Feel free to email her at kim@mind-speaks.com
This Halloween my roomies and I decided to host a Halloween party. And I was in charge of costumes this year.
Now I didn’t make full costumes. Mostly just accessories, we were on a budget this year. So I bought fabric for each of our costumes. This year my sisters and I dressed as the non- princesses in the fairy tale world.
Mija went as Alice. Now for her costume I learned how to make these adorable Anime style bows from here. I used this tutorial to make her head bow and also the bow in the back. Unfortunately I don’t have any pictures of the back of the apron but it turned out so to be awesome. I also made her Alice apron, and I stitched a little red heart in the right side corner. Her skirt was actually a strapless dress that I bought from Taxi Taxi and I converted it into a skirt with an elastic band. I felt like the skirt really pulled the costume together and I’m glad I was able to make it work. And look how adorable she looks in it.
I was Little Red Riding Hood. I made myself a cloak but only I didn’t even take any pictures with the hood up. >.< And I made myself a little skirt with a white apron attached to it. I also made the big teal bow, and the mini hair bows. I had a lot of fun making the costumes. Kat was Little Bo Peep. I only made her a purple apron and the purple bow for her shepherds staff. Jody did a terrific job on making the staff, it came out perfect. As for Jody’s costume, he bought most of the pieces. Since Mija was going as Alice we thought it would perfect if Jody went as the mad hatter. All I had to make was make a giant bow tie. I found the perfect fabric for a Mad Jody. And he bought the rest of his costume at Taxi Taxi and substituted a magician’s hat for his mad hatter hat.
I think every ones costume came out just amazing. And I had a lot fun learning new techniques. I hope I can top it next year. XD I hope everyone had a safe and Happy Halloween. I know I did.
This post was written by:
KIM VERA - (view all posts by Kim) Kim works as a museum Copywriter and helps out with events from time to time. When she isn’t working or blogging, she is probably off taking a nap. Feel free to email her at kim@mind-speaks.com
 The great thing about this tutorial is that you can be a beginner knitter and still be able to create this. I use whatever size needles I have. The bigger the size the bigger the bow. I mostly use a size 8 or size 5.
 KIM VERA - (view all posts by Kim)


 Email
Email Twitter
 Facebook
 YouTube
 Instagram
 Bloglist Me
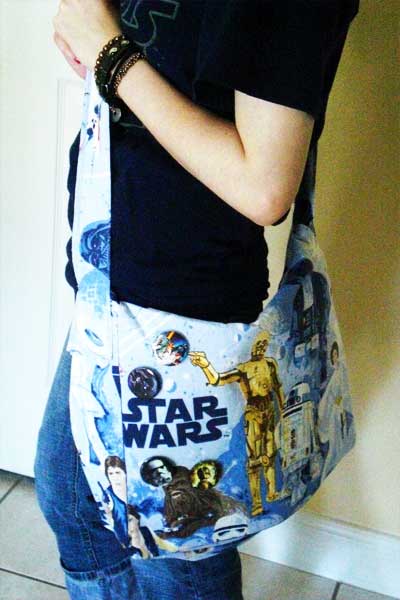