Pie Pops!!!
So my lovely sister Mija got engaged some time ago and her boss was nice enough to throw her an engagement party!! So to show how much I love her I offered to do the desserts and I decided to make apple and pumpkin pie pops! (If y’all do not know what pie pops are there basically miniature pies on a stick)*Note: I made two different version one I made with empanada (Mexican pastry)dough and the ones I made for the actual party were made out of pie crust cause Empanada dough bloated to much which it did not fit in the little baggies but both versions are delicious . But in this I will be using the empanada version but you may substitute it for normal pie dough. So lets get started !! ^^
Ingredients you will need:
4 or 3 peeled apples
Lemon juice
salted butter
1 1/2 cup sugar
1 1/2 corn starch
cinnamon and nutmeg
3/4 cup shorting
3 cups flour
1/8 tsp baking powder
4 1/2 tsp active dry yeast
1 tsp salt & 1/4 cup sugar
1 cup water
1/2 cup sugar
15 oz pumpkin
1/4 tsp ginger
1/4 tsp salt
1/2 tsp cinnamon
1/2 tsp cloves
First preheat oven to 350 then prepare the Pumpkin filling; mix all the ingredients together and set aside. At this point you can use a normal pie crust recipe or the empanada one. When doing the crust soak the dry yeast in water first then add the sugar and salt, mix and add the baking powder, cinnamon, and 1 cup of flour gradually mix in more flour until it forms a dough.
Once you’ve done that let it set for 5 mins in the fridge ( so it will be more easier to roll out) once that’s done roll out the dough until its 1/2 thick and use a dough nut cutter (or whatever you want your the shape of you pie to be) I just cut them into squares.
Next is the filling process now with this you want to be care full if you want your pies to be mini you must only put a little bit of filling so they wont over flow and get messy. (Now you can have normal pies or you can put the sticks in. when doing so make sure you put it in all the way and let them cool before you move them so they wont fall out.) Bake for 15 to 20 mins it depends of the size and shape of the pie so make sure to keep a eye on it.
Now for the Apple pie filling. First dice up the peeled apples make sure you cut them up small or at least small enough to fit in your dough. Place the apples in a bowl and add lemon juice and mix 1/2 sugar with a few dashes of cinnamon (Note: make sure to taste the mixture to see its sweet enough) Now strain the apples so we wont get those extra juices just to make sure the mini pies do not over flow. mix the rest of the sugar, Cinnamon, nutmeg, flour, cornstarch in a separate bowl.
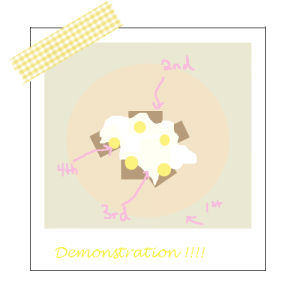
Now time for assembling the apple filling; as its show in the demonstration above first get the get the dough place (the stick at this point) the apples then sprinkle the flour mixture followed but dotting it with butter then close it with the top half. You can top both pies with Cinnamon sugar to give it a little more sweetness and color. Crump the edges with a fork so the filling does not come out and bake.
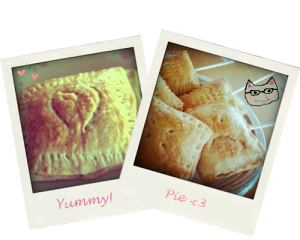
~ Now the finishing produce should look like this!!! I hope you like this recipe and if you should make them I would love to see pictures!! ^^
This post was written by:
 KAT VERA - (view all posts by Kat)
Kat is a lead pastry chef. When she isn’t in the kitchen she’s traveling space and time with Doctor Who and solving mysteries with Sherlock. Email her at kat@mind-speaks.com

 MIJA VERA - (



 KIM VERA - (


 Email
Email Twitter
 Facebook
 YouTube
 Instagram
 Bloglist Me